Mac Shell 환경설정(~/.vimrc + zsh + solarized color scheme + scm-breeze)
17 Feb 2017
Reading time ~2 minutes
Mac 터미널을 쓰며 shell, vim 편집기, git을 좀 더 편리하기 쓰기 위해 개인적으로 셋팅했던 것들을 정리하였다.
iterm2 설치
먼저 맥 기본 터미널보다 터미널을 좀 더 편리하게 쓸 수 있는 iterm2를 설치했다. 기본적인 iterm2 명령어들을 살펴보면
command + t - 터미널을 탭으로 조정할 수 있음
command + d - 터미널 화면 분할
command + [ 또는 command + ] - 터미널 포커스 변경
command + 1,2,3,4 - 화면 전환
zsh
많은 커스터마이징이 가능한 zsh를 사용해서 커스터마이징 해보자.
installation
brew install zsh
Setting
zsh를 default shell로 바꾸기 위해. chsh 명령어를 사용하자.
$ which zsh
/bin/zsh
$ chsh -s /bin/zsh
oh-my-zsh
이건 zsh configuration 관리 프레임워크이다. zsh를 좀 더 화려하게 쓰기위해 설치하자.
$ curl -L https://github.com/robbyrussell/oh-my-zsh/raw/master/tools/install.sh | sh
oh-my-zsh를 설치하게 되면 여러 테마들을 쉽게 선택해서 적용할 수 있다.
테마는 이 링크에 자세히 나와있고, 원하는 테마를 하나만 선택해서 사용하면 된다.
사용하는 방법은, ~/.zshrc 파일의 ZSH_THEME 부분의 string을 바꿔주면 된다.
default로는 robbyrussell으로 되어 있지만, af-magic, afowler, dpoggi등으로 바꾸면 테마가 쉽게 적용된다. 난 현재 dpoggi를 사용하고 있다.
테마를 사용하면, git branch 정보 등이 정해진 테마로 깔끔하게 나오게 되서 좋다.
!! warning !!
주로 파일 환경변수 등 여러 시스템 설정은 일반 터미널이나 iterm2에서는 ~/.bash_profile에서 처리하게 된다.
하지만 zsh에서는 ~/.bash_profile 대신 ~/.zshrc 파일을 편집해야 쉘에서 적용된다.
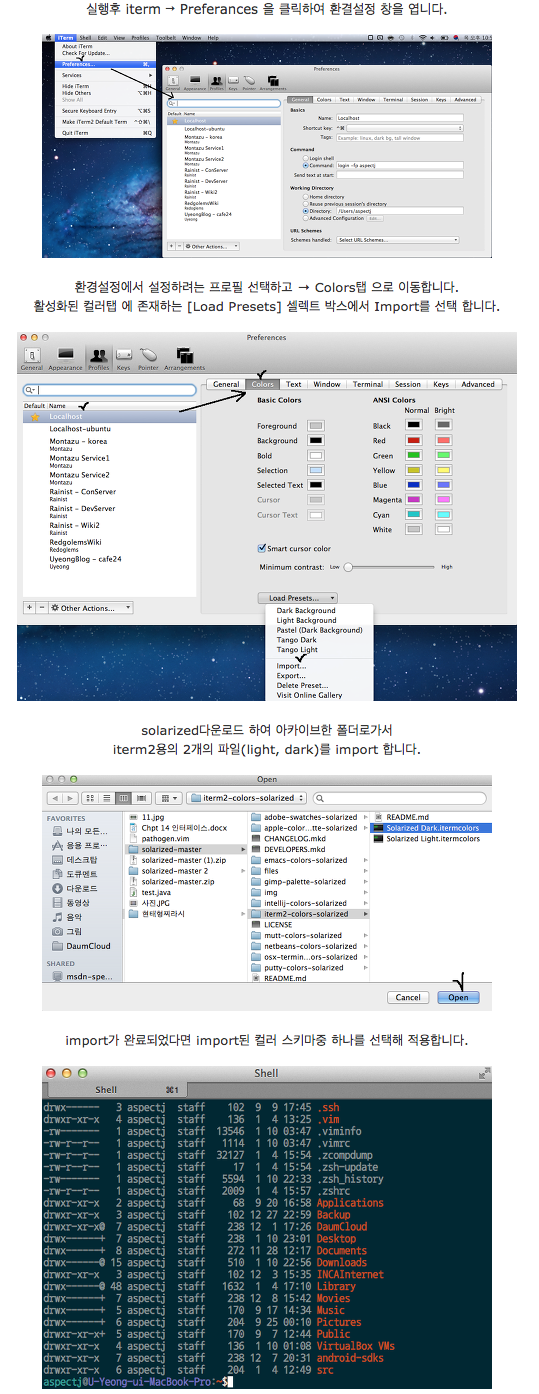
solarized color scheme 적용하기
shell의 컬러를 보기 편하게 바꾸기 위해 solarized color scheme를 적용해보자
$ git clone https://github.com/altercation/solarized.git
위의 명령어를 사용해서 파일들을 받아 온 다음, 아래의 가이드를 따라하자.
(출처 : http://redgolems.tistory.com/30)

vim 설정하기( ~/.vimrc setting)
vim을 커스터마이징하기 위해서는 ~/.vimrc 파일을 편집하면 된다. 아래는 내 ~/.vimrc 파일이다.
set rtp+=~/.vim/bundle/vim-colors-solarized

syntax enable
set bg=dark
set t_Co=256
colorscheme solarized

set nu
set autoindent
set cindent
set tabstop=4
set shiftwidth=4
set expandtab
여기서 주목할 점은
  set rtp+=~/.vim/bundle/vim-colors-solarized

  syntax enable
  set bg=dark
  set t_Co=256
  colorscheme solarized
인데, solarized color scheme를 vim에도 적용시키기 위해 하는 것이다.
그래서 위 소스를 적용하기 이전에 아래의 커맨드를 입력해 주어야 한다.
$ mkdir .vim/bundle && cd .vim/bundle
$ git clone https://github.com/altercation/vim-colors-solarized.git
마지막으로 적용하면 끝. 에러가 뜨긴 하는데 잘 적용된다.
source ~/.vimrc
scm-breeze
이번엔 git을 편리하게 쓰기 위해 scm-breeze를 사용하자. 자세한 사항은 git repo에 나와있다.
installation
$ git clone git://github.com/scmbreeze/scm_breeze.git ~/.scm_breeze
~/.scm_breeze/install.sh
$ source ~/.zshrc   # zsh를 사용하지 않을 경우엔 source ~/.bashrc를 사용
참고 : 루비가 설치되어 있으면 훨씬 빠르다고 한다.
Usage
https://github.com/scmbreeze/scm_breeze#usage 를 보면 자세히 나와 있지만, 내가 주로 쓰는 명령어는
gs : git status
ga : git add
gc : git commit
인데 git add 할 때 파일명을 일일이 입력할 필요없이 번호로 컨트롤이 가능하다는게 정말 편리하다.
– 참고 링크
http://coding-korea.blogspot.kr/2012/09/zsh.html
http://redgolems.tistory.com/30
https://github.com/scmbreeze/scm_breeze